Makeup/Skin tips for your session
Posted on July 4, 2014
Have you ever left the house feeling perfect, and as if your makeup was just right…then take a picture with a friend and you think you look like you didn’t even try this morning? It happens to all of us at some point!
Makeup for a session is completely different from the makeup you would use everyday, this is mostly due to the 25% rule. The camera “eats” approximately 25% of your makeup, no matter how nice or expensive the camera is, or how great the lighting is. This concept applies to both video, and still imagery. If you were to talk to a newscaster face to face, she would probably look like a clown, but once on the screen…her eyes pop, she has the perfect amount of eyeshadow, you get the picture…
The most important thing to remember is to FORGET Photoshop!!! These are tips to make your session natural, great straight out of the camera, and how to highlight your beautiful self.
Baby, where we’re going, we don’t need Photoshop! Or…at least only a little 😉
Skin tips:
- If you are prone to oily skin, hit your T-Zone with an oil zapping astringent, or invest in some blotting papers!
- If you are prone to breakouts, discuss blemish removal with me before we start your session. Let me know what you want removed. I generally remove any “non-permanent” markings from your skin in post processing while still maintaining a natural appearance. This includes acne, cuts, scrapes. If there is a specific spot you would like to eliminate, make sure you tell me.
- Exfoliate regularly, but don’t do it within 2 days of your session, it causes redness.
- If you change your skin care regimen, don’t do it within 2 weeks of your session. If you have a reaction to your new product, it will have time to clear beforehand.
- Moisturize elbows, knees, or any areas that tend to become dry, as these can appear grey/flaky in camera.
- As for spray tans….my general rule is “just say no” but if you regularly spray tan, don’t do it within 3 days of your session. This gives it time to “tone down” a little. If you don’t regularly spray tan, and you’re worried about looking “pasty” please don’t do a spray tan! There is always a chance that it could go horribly wrong. I speak from experience!
When I’m taking your photograph, I’m attempting to capture “the real you.” Be your beautiful self!! Nobody wants a photo of themselves where they look like a completely different person. If you are pale, like me, embrace your beauty! Porcelain skin will look more natural, and more beautiful, than a spray tan gone wrong, 100% of the time. And your friendly neighborhood photographer isn’t going to let your look anything but beautiful. Trust your photographer to bring out your natural beauty! You look awesome just the way you are 🙂
Makeup Tips for your Session
- Make sure your makeup matches your skin tone. This is actually quite difficult to do well on your own. Go to a local makeup counter and have your colors done. Most will do it for free! But see the skin tip above, and do it more than 2 weeks before your session in case you have a reaction to a new product.
- Once you have your perfect shade, do your makeup as you normally would for any event that you would want to “look nice” for.
- Follow the 25% rule. Apply your eye makeup and blush about 25% heavier than you normally would to go out.
- Check your work-I tell my clients to take “selfies” with flash and adjust your makeup accordingly.
- Check out You-Tube videos on contouring, the triangle of light, highlights etc. There are SO many amazing
YouTube Makeup tutorials! - The most important rule of makeup is to actually WEAR it. I know so many lucky women who are blessed with that smooth, blemish free skin, and don’t have to wear it. If you are one of those lucky women, you should still follow the 25% rule. This eliminates blotchiness. It’s more to smooth your skin tone!
- Don’t expect your photographer to fix it after the session.- The biggest misconception is “they can photoshop that.” This is true, but if you want me to put your makeup on in 30 or your final images. Then there will be an added fee. It’s cheaper, and easier, for everyone if we fix it in the session, not afterwards 🙂
As mentioned before, blemish removal and skin touchup are included in every package, but “major” edits are specifically mentioned in the contract as an extra cost.
All of these are to be taken with a grain of salt. Not everyone wants to look like a supermodel for their session. You should take these tips and customize them for what works for you. These are TIPS not rules. Use them to optimize the chances of having the perfect session, straight out of the camera, no photoshop required.
Be your beautiful self, and I’ll capture it accordingly!!

What to wear for your session
Posted on July 4, 2014
There are countless Pinterest boards with tips on what to wear for your photo session. Feel free to look up anything with “Photo session style tips” or “coordinating outfits for your photo session”
My main tips are as follows
- Coordinate your color scheme– different shades of the same colors are your best bet.
- Match, but don’t be “too matchy”– Everyone has seen the sessions online where everyone is wearing the same sweater….if that’s the type of photo you want, by all means do it. But in order to avoid the “cheese factor” it’s best if everyone has a similar style of outfit, but don’t become a sea of blue, see rule number 1.
- Neutral colors are your friend- Creams, browns, soft blues or pastels. Soft, warm colors. These are best and the most forgiving on almost all skin tones. These help give an overall softness and professionalism to your images. They pull double duty by helping you match your surroundings, but make you pop out at the same time; helping to prevent you from blending in to the scenery, especially in outdoor sessions.
- No bold patterns, and please, no big logos, writing, or statements- Nothing says family togetherness like a Beer Logo, right? No? Okay, then lets keep those on standby for the cookouts this summer. 🙂 Patterns are okay as long as they are soft. No large print plaids, as they tend to overpower and draw attention away from you, and place it on your clothes. Small, fine plaids are good. It’s best to stick with solid colors and save plaid, chevron, and stripes for smaller pieces, or statement pieces.
- Wear clothes that fit! Women (I’m the worst offender of this!) tend to wear baggy clothes that they feel hide parts that they don’t quite love so much. In reality baggy or loose clothing tends to have the opposite effect and make you look larger than you are! A good photographer (this photographer!) will pose you in a way that highlights your beauty and flatters your shape. If there’s a particular body part that you despise (“I hate my arms” for example) then cover them. You won’t like any of your images if you wear a sleeveless dress but hate your arms in every image.
- Have a statement piece- A scarf, special necklace, headbands for children (Or adults) a neutral wardrobe with one statement piece that “pops” brings out your unique sense of style without clashing with family members or you being lost in your wardrobe.
- No baseball caps, no sunglasses- There are some exceptions to this rule. If that’s what you’re going for in a particular pose, we’ll definitely go for it! The problem with hats is they tend to cause a harsh shadow on your face, making you faceless, and sunglasses are pretty self explanatory. The reason I mention it is because if you’re like me, if you are outside you automatically have your sunglasses on. Fedoras, newsboy caps and floppy sun hats are one of the exceptions to the “no hats” rule. But even they shouldn’t be worn for the entire session. We want to see your beautiful face!
For more inspiration, check out Pinterest for ideas, but a perfect example is Amelia and Valencia!!
Amelia couldn’t have picked out the more perfect session style for these two.
[click to enlarge image]
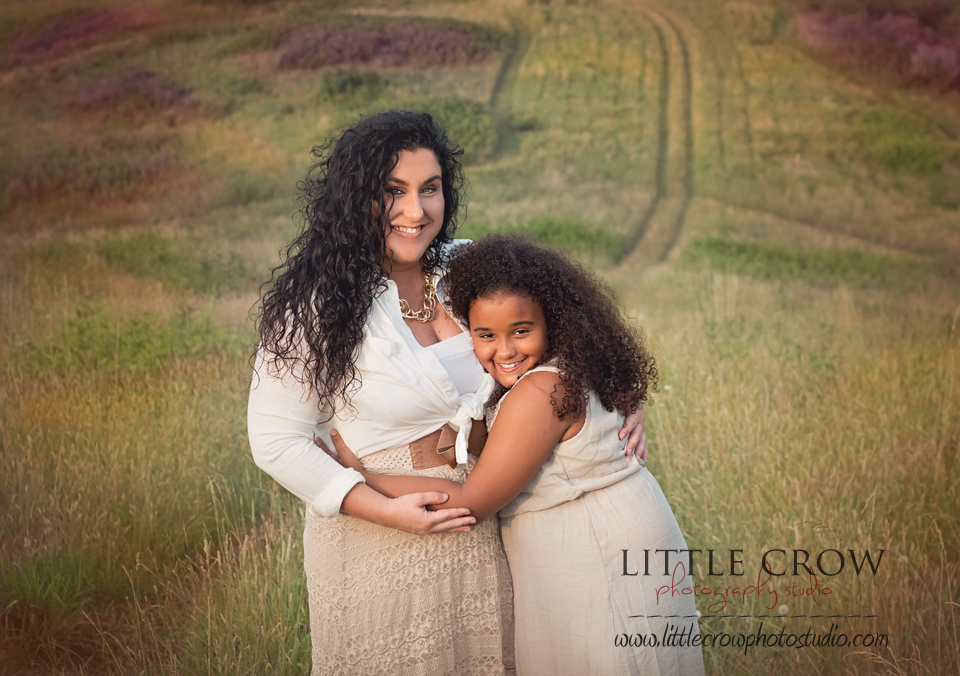
They followed all the rules and absolutely rocked their session!! Notice that they coordinate, but aren’t “matchy,” and used neutral tones. The cream colors warm their skin tones and make details pop. Notice how they pop from the background, but blend with their surroundings at the same time? Amelia’s belt accentuates her profile and serves as a statement piece, and her necklace is perfection. They nailed it. Case closed. 🙂
Of course, the most important rule of all, is to wear what makes you comfortable, wear what makes you happy. If you love your outfit, and feel beautiful; then, rules aside, that’s the most important thing of all.


Recent Comments